
one of those expensive places with the $$$$ fancy kayaksI n the past I consider using the "Durham's water putty" for a filler. For my building I decided not to because there was a warning against exposure to moisture.
That may not be a factor for you using it under fiberglass. The "professional" sites were building boats?
Building a square stern pirogue strip, stitch and glue
- Thread starter oldbuffpilot
- Start date
You are using an out of date browser. It may not display this or other websites correctly.
You should upgrade or use an alternative browser.
You should upgrade or use an alternative browser.
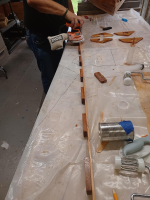
Time to glass the outside. Gravity is your friend ( or enemy) when it comes to working with epoxy. Sometimes it takes extra steps but I prefer to move the boat around to try not to glass completely vertical or upside down pieces. We clamped the forms in the best we could. John came up with the idea to fasten the forms together with two 2x2’s , so they would be one unit. It works well, I like it better than putting the forms in place with a hot glue gun.
l
 .
.
We measured the distance from tumble home to the center of the bottom, 25 ". Our cloth is 50”, so it will be close to covering half the bottom and sides at a time.
We covered the table with plastic to keep the fiberglass from snagging. We cut the 50-in piece right down the center using a straightedge and a fabric roller cutter. Then we rolled each 25 inch piece up on PVC pipe.


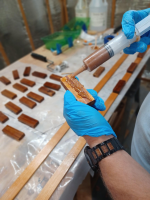
After a saturation coat was applied and lightly sanded to remove the “wiskers” we unrolled the 4 oz cloth on the boat and smooth it completely flat with large brush making sure ALL the wrinkles were removed.


We are short a few pictures here . We rolled the epoxy onto the cloth, using 4 “ foam rollers ¼” inch nape. Made the coat as thin as we could. We cut the smaller roller covers from 9” rollers available on RAKA, also ⅛” from wooster on amazon. After rolling we then tipped it off with a four inch foam brush.This makes a smoother coat and helps remove any bubbles.Temperature management is probably one of the most effective tools for managing bubbles. You really need a decreasing temperature during the cure.Old Sparky explained this in the comments above. We almost didn’t make the temperature decrease, the shop was 88 degrees, we turned the window air unit on and it only went down to 87 degrees. BUT it didn’t increase and we got a good application.

Almost caught up to current, we get to work some tomorrow, more then.
l
We measured the distance from tumble home to the center of the bottom, 25 ". Our cloth is 50”, so it will be close to covering half the bottom and sides at a time.
We covered the table with plastic to keep the fiberglass from snagging. We cut the 50-in piece right down the center using a straightedge and a fabric roller cutter. Then we rolled each 25 inch piece up on PVC pipe.
After a saturation coat was applied and lightly sanded to remove the “wiskers” we unrolled the 4 oz cloth on the boat and smooth it completely flat with large brush making sure ALL the wrinkles were removed.
We are short a few pictures here . We rolled the epoxy onto the cloth, using 4 “ foam rollers ¼” inch nape. Made the coat as thin as we could. We cut the smaller roller covers from 9” rollers available on RAKA, also ⅛” from wooster on amazon. After rolling we then tipped it off with a four inch foam brush.This makes a smoother coat and helps remove any bubbles.Temperature management is probably one of the most effective tools for managing bubbles. You really need a decreasing temperature during the cure.Old Sparky explained this in the comments above. We almost didn’t make the temperature decrease, the shop was 88 degrees, we turned the window air unit on and it only went down to 87 degrees. BUT it didn’t increase and we got a good application.
Almost caught up to current, we get to work some tomorrow, more then.
The glass on the bottom overlapped so that most of the bottom is double layers of glass, except about a foot in the center of the bottom where it just met. So we added a patch in the area of the seat. It was a good place to practice on using masking tape to leave a neat edge of the over lapped cloth. We epoxied the cloth and onto the masking tape.. When the resin was still a little green we scored the edge of the tape and pulled it up to leave a nearly invisible easy to finish edge.


Next was glassing the inside. First we made patterns out of plastic for the bottom and the sides. After we had worked on the bottom pattern for a while, John asked, wouldn't this be the same as the original pattern for the bottom? Duh! Maybe old age has set in! At least he didn’t sat Lets Go Brandon! Patterns done, we once again cut the fiberglass cloth to fit.

We did the bottom first, then today one of the sides. Once again we turned the boat to take advantage of gravity and reduce runs. I think that utilizing gravity ( trying not to glass vertical surfaces) and decreasing temperature make fiberglassing a lot easier.
Bottom was done first, using masking tape to make a neat edge, free of ragged strings. This cured for 8 hours before it was ready to trim
We made a mistake putting the deck supports in early. We were trying to use some spare time, but in the end it cost us some frustration!


Can’t work on it for a couple of days , more later.
Next was glassing the inside. First we made patterns out of plastic for the bottom and the sides. After we had worked on the bottom pattern for a while, John asked, wouldn't this be the same as the original pattern for the bottom? Duh! Maybe old age has set in! At least he didn’t sat Lets Go Brandon! Patterns done, we once again cut the fiberglass cloth to fit.
We did the bottom first, then today one of the sides. Once again we turned the boat to take advantage of gravity and reduce runs. I think that utilizing gravity ( trying not to glass vertical surfaces) and decreasing temperature make fiberglassing a lot easier.
Bottom was done first, using masking tape to make a neat edge, free of ragged strings. This cured for 8 hours before it was ready to trim
We made a mistake putting the deck supports in early. We were trying to use some spare time, but in the end it cost us some frustration!
Can’t work on it for a couple of days , more later.
I never thought of using some plastic to make a pattern for the glass. I just stumbled ahead with a solid sheet. Then when it was in I trimmed to fit and matched everything up. Some good fillets in the ends were my salvation. Especially for hiding any rough areas and smoothing things out.
I don't know how to fiberglass very well so these are just questions.
For the inside you made five patterns for the cloth? One for each panel?
After epoxying in place you then clothed and glued over each filet?
Could you have used one piece of cloth to cover the inside?
Could the panels have been glassed on the work bench after they were glued together and then stitched together? That would leave only the filet to be glassed over.
J D Thanks for the questions. If I haven't answered them completely lat me know, better yet give me a call.
We made 5 patterns for the wood panels that formed the whole boat. Each panel was stitched in its place and all panels were glued together, with epoxy glue ( a mixture of epoxy and wood flour) this mix formed the fillets on the inside joints. We did not glass over each glued joint (fillet) with cloth tape as many builders do. Instead we covered each joint with two layers of cloth, both inside and outside. We did this by glassing the boat with three different pieces of cloth two sides and the bottom, overlapping at the side to bottom joints.
We could have used one piece of cloth to cover the inside, also could have done the outside in one piece. But this is very hard to do on a boat with tumble homes, because glassing vertical is very prone to runs, and glassing an upside down panel is very difficult. It is almost too much work at one time to glass the inside or out side in one piece of cloth. You are hindered by epoxy curing too fast, especially in warm weather and it is more difficult to smooth large pieces of cloth. I prefer to work with smaller surfaces and orient the boat to keep the surface as horizontal as possible to minimize runs.
Each individual panel could have been glassed laying flat on the table, then stitched and glued together to form the boat. I have done this on a three panel boat. Some prefer to use this technique. I prefer for the glass to cure in the shape of the boat, not to have to stretch and compress it to form the bends.
I wish we could sit down over a cup of coffee and talk boats. I 'm sure we both have questions about the different techniques.")
We made 5 patterns for the wood panels that formed the whole boat. Each panel was stitched in its place and all panels were glued together, with epoxy glue ( a mixture of epoxy and wood flour) this mix formed the fillets on the inside joints. We did not glass over each glued joint (fillet) with cloth tape as many builders do. Instead we covered each joint with two layers of cloth, both inside and outside. We did this by glassing the boat with three different pieces of cloth two sides and the bottom, overlapping at the side to bottom joints.
We could have used one piece of cloth to cover the inside, also could have done the outside in one piece. But this is very hard to do on a boat with tumble homes, because glassing vertical is very prone to runs, and glassing an upside down panel is very difficult. It is almost too much work at one time to glass the inside or out side in one piece of cloth. You are hindered by epoxy curing too fast, especially in warm weather and it is more difficult to smooth large pieces of cloth. I prefer to work with smaller surfaces and orient the boat to keep the surface as horizontal as possible to minimize runs.
Each individual panel could have been glassed laying flat on the table, then stitched and glued together to form the boat. I have done this on a three panel boat. Some prefer to use this technique. I prefer for the glass to cure in the shape of the boat, not to have to stretch and compress it to form the bends.
I wish we could sit down over a cup of coffee and talk boats. I 'm sure we both have questions about the different techniques.
Your answers have cleared up my understanding of how you glassed the boat. thanks. I thought you were doing five "panels" of glass on the inside.
Now it is clear why you turn the boat to do the outside. My experience has been limited to three panel boats. The tumblehome panels are the problem because the cloth would not lay onto it.
I recently saw a post on another forum about making chine logs laminated to their installed shape. This was for whitewater skiffs used on the Colorado River. I can see where that would be stronger than bent ones but the bent ones work just fine on the bayou.
It may be easier to glass the panels and then bend in place but glassing the panels on the boat(laminating) is probably strongest.
Happy to explain, my initial probably wasn't real clear. When this project is over I'll have questions about building with no epoxy for young people. chine logs, flare, interactions.Your answers have cleared up my understanding of how you glassed the boat. thanks. I thought you were doing five "panels" of glass on the inside.
Now it is clear why you turn the boat to do the outside. My experience has been limited to three panel boats. The tumblehome panels are the problem because the cloth would not lay onto it.
I recently saw a post on another forum about making chine logs laminated to their installed shape. This was for whitewater skiffs used on the Colorado River. I can see where that would be stronger than bent ones but the bent ones work just fine on the bayou.
It may be easier to glass the panels and then bend in place but glassing the panels on the boat(laminating) is probably strongest.
Putting the deck on was next. The rough cut deck was fitted and aligned to center line, then removed to apply glue..The epoxy glue mix was placed on the very narrow edge of the side and also on the deck supports,The deck was put back in place and some light weights placed on it to make sure it didn’t move.The next day the deck edge was trimmed flush at the same angle as the side slope. The multi tool works fine for this,some folks prefer a pull saw.the deck edges were sanded clean and rounded over so the cloth would cover the edge.


Next we use fiberglass to cover the deck and down the side of the boat a few inches. The compass rose image was carefully placed under the cloth and epoxy resin glassed the whole top.

The compass rose was printed on tissue paper by cutting the tissue a little smaller than computer paper and fastened to the paper with a glue stick at the top. Tape will work also.The dull side of the tissue was printed on. Sometimes it takes a few tries to get it to feed.
The tissue paper disappears when the cloth is wet out.
While we were in the image business we also did the transom the same way.
Today was a good work day. We added some support and trim pieces to the deck and the transom. Leftover stripped and glassed material from the deck cut offs added a little more color to the stern.


Next it was time to get the inwales and rod holders ready to install. The strips, spacers and rod holders (tumble home supports) were all cut from cedar, Coated with epoxy,and ready to install tomorrow. Also at one point today we had some leftover mixed epoxy, so we put a third fill coat on part of the outside, she’s starting to shine!
Next it was time to get the inwales and rod holders ready to install. The strips, spacers and rod holders (tumble home supports) were all cut from cedar, Coated with epoxy,and ready to install tomorrow. Also at one point today we had some leftover mixed epoxy, so we put a third fill coat on part of the outside, she’s starting to shine!
This is a very detailed documentation of a boat build. It should be helpful to other builders.
I probably missed it, but what weight glass? Also any idea how much epoxy will be used?
As always I love the wood and bright finish. The decals are an attractive touch.
I probably missed it, but what weight glass? Also any idea how much epoxy will be used?
As always I love the wood and bright finish. The decals are an attractive touch.
Thanks, I hope it helps somebody. The cloth is 4 oz double layers on the bottom and ends. Kinda hard to keep track of epoxy. I know that with a boat this size if I start with a new gallon of resin there is about 2 " left when done, so about 1 gal of resin and 2 qts of hardener. We hope to build an approximate bill of materials with cost.This is a very detailed documentation of a boat build. It should be helpful to other builders.
I probably missed it, but what weight glass? Also any idea how much epoxy will be used?
As always I love the wood and bright finish. The decals are an attractive touch.
The spacers are epoxied to the longitudinal rails and left to cure overnight. The top edge was touched up by sanding.


In the past I have glued the spacers to the boat and then glued the long rail to the spacers in place on the boat. John thought that gluing the spacers to the rail first would be easier… he was right it worked better. We covered the side of the boat with plastic as this process can get messy. We put epoxy on the spacers as they were glued to the top side bending and gluing as it went. On the second side we put the epoxy on the spacers while the assembly was flat on the table, and then started at one one and worked to the other end. The second method was much easier than the first try working from the middle. The gluing and bending is a two person job.

It takes a lot of strong clamps. If you use this kind of clamp, be sure to put the long end in the boat, out of your way. I know why Beekeeper has tape over the sharp ends!

More later.
In the past I have glued the spacers to the boat and then glued the long rail to the spacers in place on the boat. John thought that gluing the spacers to the rail first would be easier… he was right it worked better. We covered the side of the boat with plastic as this process can get messy. We put epoxy on the spacers as they were glued to the top side bending and gluing as it went. On the second side we put the epoxy on the spacers while the assembly was flat on the table, and then started at one one and worked to the other end. The second method was much easier than the first try working from the middle. The gluing and bending is a two person job.
It takes a lot of strong clamps. If you use this kind of clamp, be sure to put the long end in the boat, out of your way. I know why Beekeeper has tape over the sharp ends!
More later.
Attachments
The clamps are gone, the inwales touched up a little bit, and on to the rod holders and transom brace. This process was pretty straight forward. Clamping the pieces in place was a challenge we settled on masking tape. Epoxy doesn’t require clamping pressure so that worked fine, unfortunately we didn't get pictures of the tape.The rod holders are really braces to add stiffness to the tumble homes.

The transom brace is for when John decides to put a 20 horse outboard on his boat!! He put some cut offs from the deck to good use. The strips fit right in,

We still have a little clean up to do, then tomorrow lightly sand in and outside and a fill coat. From here on out it’s all finish work.
The transom brace is for when John decides to put a 20 horse outboard on his boat!! He put some cut offs from the deck to good use. The strips fit right in,
We still have a little clean up to do, then tomorrow lightly sand in and outside and a fill coat. From here on out it’s all finish work.
On similar boats I’ve found the top edge of the cedar side gets quite a bit of wear from the double paddle, resting on the tailgate and such, to correct this I Started adding a trim strip of harder wod around the top edge. Most lumber yards carry outside corner trim. The trim I use is ½ “ .
It works well in either oak or pine.
This piece is laying on the deck.

Epoxy and clamps do the job.

Two people make this job easier.

It works well in either oak or pine.
This piece is laying on the deck.
Epoxy and clamps do the job.
Two people make this job easier.
This is a better picture of the trim cap on the gunnel.

Time to start the finish steps on the bottom. Here John is scraping the seam where we doubled the glass cloth along the keel.
Sanding is done so we’ll mask off the bottom for more fill coats. This masking, that I picked up somewhere a long time ago, has 12” of plastic drop cloth fastened to the tape.In this picture we are making sure the tape is sealed well by rubbing with John's credit card. The epoxy graphite mix can make a mess if it seeps through the tape.

The mix for the bottom will be epoxy,graphite for slick,with a little aluminum silicate for hardness, on the final coat we may add just a little rock hard putty for grins. Whoops the scraper picture didn't make it to the post.
Time to start the finish steps on the bottom. Here John is scraping the seam where we doubled the glass cloth along the keel.
Sanding is done so we’ll mask off the bottom for more fill coats. This masking, that I picked up somewhere a long time ago, has 12” of plastic drop cloth fastened to the tape.In this picture we are making sure the tape is sealed well by rubbing with John's credit card. The epoxy graphite mix can make a mess if it seeps through the tape.
The mix for the bottom will be epoxy,graphite for slick,with a little aluminum silicate for hardness, on the final coat we may add just a little rock hard putty for grins. Whoops the scraper picture didn't make it to the post.