Building a square stern pirogue strip, stitch and glue | SouthernPaddler.com

Building a square stern pirogue strip, stitch and glue

oldbuffpilot

Well-Known Member
May 13, 2014
629
34
80
Central Kansas and Central Texas
Welcome our new member J Pirhalla 1170. Let me introduce you to him. John is my son-in-law. He is Building a boat utilizing my expertise and advice!! He is by no means a novice woodworker and this is about to be fun. Stay tuned one of us will be posting pictures and notes. Oh, I about forgot the warning: John is retired military, Army EOD and a Marine Proceed accordingly!

We are building a square stern Pirogue (?), at least that's what we are calling it.The bottom is from the JEM Crawdad plans.. It will be Strip, Stitch and Glue. (SS&G), the boat will be 11 ft 6 in Long with about a 30-in beam and about 8-in sides. Hopefully we can build it out of two 2”x6”x14’ western red cedar boards and of course fiberglass and epoxy.
QQj9h4iYaGX8RUPp2RqlDZAJ9oDz0gfGb3WLg3uwuGrBA4ufJceD55pi-Ll7QuabweObJEhKZNHrRamzy0EmHdsIdSyF5p_AcI-AimWzPKgZPwVEYd3O-zjpm-J8Vg6J_FDmrx919YTKTZA4ADvdtIs


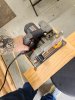
We got about 18 cedar strips from each board, ¼ “ thick, 1 ½ “ wide, 14’ long. I prefer to rip them with a “skill saw”. My wood jig for the saw is kinda heavy,so we tried it with a piece of angle aluminum for a saw fence. John using the aluminum fence.
zkMaT6Y_RPXQ8yr93HMAm1QyzqB9o6DhKw_oVEWsFxVQA7fUcKsEuYnVp43mZqbuH-XjiNgyj1wI97BrbyIzCIlf0MlAvZa-2X85badoGEkWPL5c-46LnBfF7Fv8_GHYugC1AhEhhbJA3RhsZFA7lA


That didn’t work as well as the wood jig, so we changed back to the wood jig. I find this much easier and more accurate that using the table saw, long boards are hard to handle, especially for one person.


iG2-S7WsTs9HfyVcxmdFJ-vpCoxjXGTaGAxWTLrJSmtTRq87ikpxp2Njf19gyM49JO4vKa6MGVBmczWXG39e-Xx9X7PEp99Xe6sK9DCiY8mENoLO1ccm_lxBxRBg5NMHeOH7v6IKCzjLc9kP8hFMjg


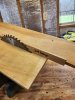
These strips then went through the planner. This step may not be necessary as all the boards will go through the planner after they are glued into panels. Planing them now makes them easier to glue into uniform panels.

0xGY0XepkX842OVvpY51wc_ygC6vU854OuJ8IqpsS873TC9QDEAlAugzUotWMbhNabaq6xDh2xzJP_cGSR0W5N00OwnmEhRjdccKErY1P8gJlK-sRlY__niUQxwiaaHLKdKBmlkOZORwMO1rM8RGwQ


Then, on the table saw we ripped several of the inch and a half wide strips into ¾” wide strips. These narrower strips will be used for the side panels that have too much curvature to bend the inch and a half wide boards.
MyFQSL4dYBKjOCMldYNvCY_G0eOFaoGJTQH8ttu_5wxejV_Nf3doOhVxznO_UJFzwetXE-8zHzydFn2vB9Ejc5nVu4llz33J5qsrp0nh0InIkO7dGgvxQTdN14KAitNrJbXOcU7aNgS-7zHrYNBiGQ


This ended our first work session.More later.
 

beekeeper

Well-Known Member
Mar 4, 2009
1,917
59
Welcome "J" to the board. I'm glad someone is building.
Nice looking boards. Clear cedar is hard to find over this way.
Is the wooden saw guide adjustable or would you need another one for different size strips?
 

jpirhalla1170

Member
Mar 16, 2023
6
0
53
Welcome "J" to the board. I'm glad someone is building.
Nice looking boards. Clear cedar is hard to find over this way.
Is the wooden saw guide adjustable or would you need another one for different size strips?
Thanks beekeeper. I have a great teacher. The saw guide is not adjustable. I will post some pictures of the saw guide when I figure it out
 

beekeeper

Well-Known Member
Mar 4, 2009
1,917
59
I like the idea of the jig and not needing help cutting the strips on the table saw.
I don't mean to distract from the boat but how you do cut the last strips when there is little board left to support the saw?
 

oldbuffpilot

Well-Known Member
May 13, 2014
629
34
80
Central Kansas and Central Texas
JD I'll try to expand on that a little bit if you have another Inch and a 1/2 board like another 2 by 6 to lay beside the one you're Cutting you can strip it right down to 1 cut left I also like to secure the board to the saw horse somehow double sided tape or or something like that makes it easier. This picture shows what we took to the tablesaw.
20230317_101949.jpg
 

beekeeper

Well-Known Member
Mar 4, 2009
1,917
59
I thought that might be how you could do it. Ripping strips on the table saw works best with two people, at least for me. I can make it work using my adjustable rollers on stands but even that goes much smoother with help.
 
  • Like
Reactions: jpirhalla1170

oldbuffpilot

Well-Known Member
May 13, 2014
629
34
80
Central Kansas and Central Texas
Our next step is to make cardboard patterns of each panel for the stitch and glue boat. This will include converting the paper plan measurements into the shape of the various panels that will form the stitch and glue boat. For this boat we used the plans for the prototype Crawdad bottom, and side panels were modified from a previous build. We made a cardboard pa
gO3SB2ssP5WUe3uSI4AaHafsCjHvUGNaI15g_zUQz-vangvDI8vgOzOortA8NmxsmKE1Gi2RgyGihLETdEFr2hYfyU3ga1KK6JmfsxWpfUPsNeCzelpdLMYiv6nhmxOS3wtmOWSN_lZ1bLoNHWTebLM
ttern for each panel. In this picture John is drawing a vertical grid every 12”, these will be used as reference lines for “lofting the pattern panel shapes. Instructions for lofting are in several stitch and glue online tutorials.


The lofted points from measuring the grid are connected using a limber wood strip to form the curved lines of the pattern panels.In the photo below John has already cut out one of the bottom/side patterns and is lofting the side/tumblehome pattern.

e2rEg5wp57_rQsPmSUFcREn7JUPfM1y0TQgt6ijeJN3tvMuyLGFirh2i6d1rWFD9syQYiRbjqlwu58K3_jUPzaUMCCFIyi3NvCelzyBtPO5rEWHV7WRi8j4yoDZqaUXRZybJX-1Lv2HZUhp62Y2Uw8E

The cardboard patterns are then traced onto kraft paper. We used a different color for each panel,ie, sides and bottom. We then covered the paper with plastic so the wood glue will not stick to the paper.

XDkJjjXU8CBxhdkQwhenX541LZq-MsaKYDVYWwhevDLr2Y-Uv0DxkMCe1VfULCeslQTV_tz_tPnetOGqZj0vOb_CvQnk1UALMs92Q-I-cW1LMCRVEBUv28D286KP_ggABnYYQx7dcLzQMJ5RF_t2FPE


The cedar strips are glued into the rough shape, (a little oversize) of the panels that will become the sides and bottom of the boat. Finish Nails are used to provide an edge of the pattern and to hold clamps if needed. The cedar strips are glued, pushed into the curved shape of the panel, and fastened to the table with 23 gauge headless brads. The brads are not required for every cedar strip
We only use the brads where required to clamp the strips where needed.


gytKnGt951cz29wWRo2oLcDoNpBOU3T9JYixDx7WdOK8B5JDOgAe4E8R9av_-pEtPrjCvhb_TeliYzsb4LGGqopf6GgHILMgB0WHXuiNXiVZrLKUgzx1FCZ-mXK4cIHc7WK1vQDe2B6rv3m-itt3Hlw
imwxDXz2D246gmFLPPFwtOIBGJtNbC2qvEAl_8SpLU9uxJ_qXHJw0Lfe9lX8Q9cqQhlnThB8HmzmD59g1gRbCV7FFAEJ3b6yWtDhC4doQDPKAm8p38gN-BjKy7Nxh5vO2KsZjpME8zhxB9ZCQvwWakU


DrmM_f7PzPilpravc5-WovTEdWA0qWVqOBRLctUqdf6wO36KCoVxAC-qwNwZ5vyGSKFTwGIvwoMabKMVOGVhT6Oi3whyJqVint7EJU6K6tXr7D_A8lfZK5wA0EUoSn1R-OBb4aYx7_7iyf6g7hDiYgQ


The glued panels cure overnight and then removed from the table. They come up easily after getting an edge started. They are not as fragile as you would think. After several builds I've never broken a glue joint. edit a glue joint came loose today. We determined it didn't have much glue in it!
 

oldbuffpilot

Well-Known Member
May 13, 2014
629
34
80
Central Kansas and Central Texas
Now we cut the panels out to their final shape. First we will use our cardboard patterns to
Trace the pattern shape on the cedar panels. We didn’t get a picture of this step, these photos are from a previous build.

1iG296cykQaw6C9RI9oCq5CKxUMi2AN2Zc3QQgApFrcnPv3f_FsHpc_IXBmE3sqKTAkTXSpMKA3KCLzrmVGXPGvi5W42ys_Ca6zZ-8nzumZml1qo3sAOTXTBqSwrbqq5eaYCcxvtc1xXnsGygInaWfk


Dl1L4_LJYeMBsqX4ftBiJoWyvcJgWN811OR657xfX-Ov_llp6e4whwXq_3esWhz8uWSz4w4Una_qZA5Z8vzTp3pA2mKNJ6BvHOJ0VW769oS_QX4rf00Dm1jEf-W-QOIKdDbTklFbDMMKbE2Bex9HiKg


We clamped the like shapes together, ie, two side panels, two bottom panels together and used double sided tape to hold them. Some wood scraps on the panels made it easier to position on the sticky tape.

mIrR-u8l5w3g_uLMoIojXdrVCMRmEVVRG7bpqSpf7JtiXNti97-6MyKdakEO5u7RyFDZOf6K7LKUMHZJdXe3tTb_8Fnmj-SoLMMyuekIruTJWE9qic3Z6_mky_Sn4JRpygYiP9A_ZkgPX-5iHIzEbpg


We cut out the shape just a little outside the lines we previously traced. John tried the jig saw, but preferred the “skill saw”.

dD9o4WumJ3_HTBjDL8ywy4UsHKBaPgD56si0uMA9JMrFnW7IYq1nIbTfOLgDXk2cVAh_dWDDXdfjQKSB4p1BQN4E-wMZjydsB7PDjiDGaTNWXwIkRbwPPtZesS4-jge1FrSy-u6-sc-Da9NQGE0IUkk


After cutting the panels very close to the outline we used the belt sander to make the final “cut” to the line,this also helps to “fair” the curved edges of the panel,

ur8LKaTOtD5seBR9bnBGbfVlLmnFq8m_k6f6k932hV5AvC-NLYp7OllykAi7wEDxXkNoCHgZzD8_xZcOc2wtfU3VPGKFBvXj4sbmAfWQOlJQ6oMbEIHw74ZQlwDCxooInovtM34EIj0ErMKOC3SwHZg


Now we’re ready to make these boards look like a boat! First we drill stitch holes at the centerline of the bottom and around the perimeter of the bottom, using a jig with holes 10” apart and !/4” from the edge of the panel. The bottom panels are still stacked together with tape.


tape.
Rk4x_bSfpMZGCeCLAA20PHUihrRgr4UiLlCnZbEG5ecCKbKsA3p2GrOKv1ixzsxjg5OwmjbxwOhhR2cmtupImTgvVpgAbkG5e1seK4fqbGrXFzrimP0ZLzQXj51ZQiP793kZ2NLLgpbJXACRXnVYwmQ


Tie wraps are loosely fastened down the bottom centerline, then unfolded like a book.

qOCUN0xQ8ZexgW3G7QonvnlojUeS35IhdlEkrpT7f-CZja3kHR-hWsAGm4vsKm--uLok7tg-_TmGf7hlLTx6K6U-e_wZfHlm57_oVhDA4WtKqZIQjTv5QdPlJIrZx2i-OAfQW0g5o4opIFevFU-jhbs


Also drilled stitch holes for the forms.
b-PEGHt0sILU8NLvDu0_pQrIj846RXILhI6laqMFl9TLZPiSD0SOAZX2ryYlp9dv-HBIQ-HTEyiebc77LcbSvi6ytxKq004ak31_0IPEQykK07Q84J8YhBpp17zavPJ7VtQrnbs-_65Sl-Zt_hFvBn4


The forms are stitched into place, they are a little floppy but tighten up when the sides are put on. It’s not really a problem, but sometimes I keep the forms upright by placing a very short 2X4 on the edge and screwing it to the forms. It’s also worth noting that marking the bow and stern on the side panels would have been helpful, They just won’t fit on the wrong side!
4xhD8-7pLAhY1U4_YmU2691cubpXoAhiogBchfs8gLW-VCjQYcKPk6jEG7R-cUiMe2di5cbui-3F4s5CCHn1Rkfy_55XjuVqhuHHmfhmby6QjRcKfFQEbG8wLNIZradvjLp7KeXs_gx-SIJPyCum9JE


More tomorrow
 

oldbuffpilot

Well-Known Member
May 13, 2014
629
34
80
Central Kansas and Central Texas
Today's building was a “do over day” as we were stitching one of the short side panels we noticed one of the glue joints was a little loose, that “not enough glue” in the joint was about to bite us again! So we unstitched the side panels, put them flat on the table and reglued a few places.
xtrVMlnlKpauAKdNmA0Cz5fLHgsmnhX0P57fr4VA7Hi-X_KDonTmwzDzoK70q3cpKPoyrJajSePYVbbzIdl-kDr-0J6R8M-z6duXdCS2dcXgWa9Z8ST_tvVrk1uMBfIlWRf0a-t8NOJgA5gWoyuUwVY


Since that meant we were done for the day we decided the transom we had already glued up wasn’t stout enough! So we ripped, planed, and cut some new strips for the transom. ⅜ “ this time, with lots of glue!
DOZ9Z3m7--LW6w_Off9eiYyF0Hdak5jpT8a-1Bp4qrVBTiTsghRo5i-2T7G28n2X6YSP2Ps7wqrOWx5327tUsmdOaJL4XRMBTHtoLeo8lsVdolunJZRnSHQp3H5pf2fV0gdEVt6IFApbvL7-jBuoXaU


Not pirogue building, but a big thanks to John for saving my aging body from this chore.
GFR3vfaGcsugrOK5KxJceX8RxSYzhOWpbeLb4trfnmoUpeOFIV0ljNMM0Bkzpr4bzyqVq-PODg9XIE9VkV_1zFbzV1B3HdqCRTetrHqBqtDPyDwjs_J33qjurtCIb-acJCYVWn3-jiz3NOIpoz423rQ
 
  • Like
Reactions: jpirhalla1170

beekeeper

Well-Known Member
Mar 4, 2009
1,917
59
Questions if you have the time.
How much "V" is in the bottom / how far below "flat bottom" is it?
The bottom side panel is how wide/tall? The next one?
How tall are the forms and is this the depth of the boat?