
JD, I'll get back with those measurements probably tomorrow.Questions if you have the time.
How much "V" is in the bottom / how far below "flat bottom" is it?
The bottom side panel is how wide/tall? The next one?
How tall are the forms and is this the depth of the boat?
Building a square stern pirogue strip, stitch and glue
- Thread starter oldbuffpilot
- Start date
You are using an out of date browser. It may not display this or other websites correctly.
You should upgrade or use an alternative browser.
You should upgrade or use an alternative browser.
Anytime on the measurements is fine.
I have found that strips (for my tumblehome panels) that are bead and coved experience less "do overs" and stay aligned better than just edge gluing. They do take more time and tools to make so it may not be worth it to you.
Seem to remember Ron (Tx. River Rat) sometimes made his panels from 3/8" strips glued together and then planned them to 1/4" after they dried.
Building techniques are like design features, change one thing and it will effect something else. What works for me may not be best for someone else.
I find using diagonal cutters to remove the brad nails works very well. Grip the brad right against the wood, then twist the cutters sideways to pull the brad. It doesn't take much grip to hold the brad against slipping and the cutters release the brad easily. For long brads the cutters re-position quickly if necessary to completely remove the brad.
Anytime on the measurements is fine.
I have found that strips (for my tumblehome panels) that are bead and coved experience less "do overs" and stay aligned better than just edge gluing. They do take more time and tools to make so it may not be worth it to you.
Seem to remember Ron (Tx. River Rat) sometimes made his panels from 3/8" strips glued together and then planned them to 1/4" after they dried.
Building techniques are like design features, change one thing and it will effect something else. What works for me may not be best for someone else.
JD, I'll get back with those measurements probably tomorrow.
This is my attempt to draw a cross section of the new boat. I drew the measurement for the beam wrong. the BEAM is 32" not the bottom. Hope this answers your questions, if not let me know-- I like to discuss boats

This is my attempt to draw a cross section of the new boat. I drew the measurement for the beam wrong. the BEAM is 32" not the bottom. Hope this answers your questions, if not let me know-- I like to discuss boats
Don't think so, but it would be hard for me to get it to that point. Maybe this summer I can get a kid to try it. Matt often has said the widest point near the water line is most stable.The drawing was fine. Looks like the beam, floor width and depth are similar to some of my builds. It looks stable and I know the design works well for you, but do the tumblehome sides reduce the secondary stability?
My guess is that you are right and would not be a secondary problem in a pirogue with "normal height sides." The 48 degrees flare would make it harder to get it to that point?Have the kid do the test. I would not want you to take a dip.
Not sure I understand Matt' statement. Sounds correct for initial stability. What happens when the boat is leaned and the volume is reduced?
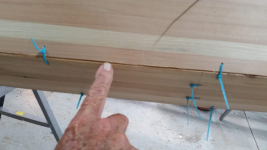
We’ve had 2 or 3 work sessions since I last posted.. The short and high sides are stitched in place. In this picture John is finishing stitching the right high (tumble home?) side

The stitches are tightened a little bit at a time symmetrical around the boat. The diagonals on the first and last forms are checked equal, as the stitches are tightened. When the boat is shaped and firmly together make sure two sawhorses are level with each other. Put the boat upside down on the sawhorses and check for wobble.

This is the edge to edge that I prefer for the panels to meet, this leaves a gap for the epoxy. Some places it’s hard to do and doesn’t always come out that way.

The inside seams are taped over in preparation to use epoxy to “spot weld'' the seams together. The tape will prevent any epoxy leaking through to the inside.

Once again the boat is upside down to apply epoxy spot welds between the stitches. The spot welding locks the boat in its final shape.
Next the plastic stitches are removed and epoxy applied in the gaps to complete epoxying the outside of the seams. We didn’t get any pictures of applying epoxy to the seams. I'll try to remember to get some pictures when we do the inside seams. That’s all for this post.

The stitches are tightened a little bit at a time symmetrical around the boat. The diagonals on the first and last forms are checked equal, as the stitches are tightened. When the boat is shaped and firmly together make sure two sawhorses are level with each other. Put the boat upside down on the sawhorses and check for wobble.
This is the edge to edge that I prefer for the panels to meet, this leaves a gap for the epoxy. Some places it’s hard to do and doesn’t always come out that way.
The inside seams are taped over in preparation to use epoxy to “spot weld'' the seams together. The tape will prevent any epoxy leaking through to the inside.
Once again the boat is upside down to apply epoxy spot welds between the stitches. The spot welding locks the boat in its final shape.
Next the plastic stitches are removed and epoxy applied in the gaps to complete epoxying the outside of the seams. We didn’t get any pictures of applying epoxy to the seams. I'll try to remember to get some pictures when we do the inside seams. That’s all for this post.
The boat is coming along. When you turn it upside down on the sawhorses its shape is not all that different from some of my boats (wide panel on bottom).
Probably tired of me asking questions, but one more please.What size holes do you use for the wire ties/stitches? Will smaller ones work?
Probably tired of me asking questions, but one more please.What size holes do you use for the wire ties/stitches? Will smaller ones work?
We’ve had 2 or 3 work sessions since I last posted.. The short and high sides are stitched in place. In this picture John is finishing stitching the right high (tumble home?) side
The stitches are tightened a little bit at a time symmetrical around the boat. The diagonals on the first and last forms are checked equal, as the stitches are tightened. When the boat is shaped and firmly together make sure two sawhorses are level with each other. Put the boat upside down on the sawhorses and check for wobble.
View attachment 1751
This is the edge to edge that I prefer for the panels to meet, this leaves a gap for the epoxy. Some places it’s hard to do and doesn’t always come out that way.
The inside seams are taped over in preparation to use epoxy to “spot weld'' the seams together. The tape will prevent any epoxy leaking through to the inside.

Once again the boat is upside down to apply epoxy spot welds between the stitches. The spot welding locks the boat in its final shape.
Next the plastic stitches are removed and epoxy applied in the gaps to complete epoxying the outside of the seams. We didn’t get any pictures of applying epoxy to the seams. I'll try to remember to get some pictures when we do the inside seams. That’s all for this post.
The big zip ties the colored ones take a 1/8 inch hole.I ran out of the small ties I prefer. I ordered some small 6 inch long ties from amazon that take 1/16th inch hole. Here's the link on Amazon to the small zip ties. https://www.amazon.com/Cable-Self-L...=B0991MX3PY&psc=1&ref_=pd_bap_d_grid_rp_0_1_tThe boat is coming along. When you turn it upside down on the sawhorses its shape is not all that different from some of my boats (wide panel on bottom).
Probably tired of me asking questions, but one more please.What size holes do you use for the wire ties/stitches? Will smaller ones work?
Attachments
Last edited:
Time to fill the fillets on the inside seams. I like to use masking tape about quarter inch from the seam This makes a more even filletl and less cleanup.View attachment 1752
View attachment 1753
View attachment 1755
This is the edge to edge that I prefer for the panels to meet, this leaves a gap for the epoxy. Some places it’s hard to do and doesn’t always come out that way.
The big zip ties the colored ones take a 1/8 inch hole.I ran out of the small ties I prefer. I ordered some small 6 inch long ties from amazon that take 1/16th inch hole. Here's the link on Amazon to the small zip ties. https://www.amazon.com/Cable-Self-L...=B0991MX3PY&psc=1&ref_=pd_bap_d_grid_rp_0_1_t
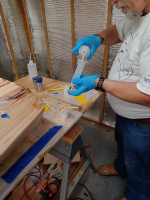
John John likes to use the syringe I believe it is more controllable than the pastry bag.
It takes a little effort to clean the syringe up lacquer thinner does a good job and I usually get five or six uses out of one syringe.
The tape needs to come off while the epoxy is still in the green stage usually about 4 or 5 hours of cure at normal temperatures.
Time to end this series of pictures. the pictures are giving me fits they change size after I post it. I've got to take some time to figure this out more later.
Attachments
Last edited:
I would epoxy saturate the wood on each side of the seam. After it cured then lightly sand it , wipe clean with a dry , clean , cloth. Lay down my tape about 1/4 inch on each side of the seam. Then when mixing the epoxy I would add some wood flour ( mine was redwood from the sander when I made the stripper pirogue ). It pays to keep the sandpaper dust. Then lay down a strip of the epoxy , wood flour mix. Using only the finest equipment I would smooth it out with a old Cabelas Club Charge Card. The redwood flour gave it a reddish tinge but not overpowering just a nice contrast to the lighter wood the boats were made from.
Looking good! My favorite tool for an epoxy/glass boat is a cabinet scraper. Works many times faster than sanding, for drips. Oh, you don't have drips? Ha! With a scraper, you can cut away just the drip or ridge you want without touching the surrounding wood. I made mine from a 6" piece of 1" banding material and ground a radius on each end.
Thanks for the suggestion, I bought one from a wood shop supply place. used it for a while and decided I needed more practice at sharpening it. Kind'a let it go. I need to give it another chance. It worked good from the store I need to try making the burr and edge again.Looking good! My favorite tool for an epoxy/glass boat is a cabinet scraper. Works many times faster than sanding, for drips. Oh, you don't have drips? Ha! With a scraper, you can cut away just the drip or ridge you want without touching the surrounding wood. I made mine from a 6" piece of 1" banding material and ground a radius on each end.

Thanks John, we are both having a real good time!View attachment 1763
Building my first boat and have the greatest teacher
We used scraps of tape to mark places that need more filling. It’s easy to miss some when you are filling small holes. We also tried something new for me, for these holes that need just a little fill we used water putty. The same stuff I mix in the bottom graphite to make it harder. The putty dries quick and is easy to clean up. I saw this on one of the “professional” sites. We’ll see how it works.


This is a picture I left out, old sparky commenting on finishing fillets with an old credit card reminded me I left this out. Please keep the comments and suggestions coming, we will all learn new stuff.

This is something else new to me, John is laying out the deck in a different pattern. Looks like it’s going to work fine and look good!


The rough shaped deck was too wide for the planer, we planned to plane each side then mated the matching sides together.


Final adjustments were made and decided the deck needed some support so we put a center board on the back side to keep the sides lined up.
Then we glued in some deck supports in the boat. We taped a stick to the top of the deck supports fo hold while gluing.


This is a picture I left out, old sparky commenting on finishing fillets with an old credit card reminded me I left this out. Please keep the comments and suggestions coming, we will all learn new stuff.
This is something else new to me, John is laying out the deck in a different pattern. Looks like it’s going to work fine and look good!
The rough shaped deck was too wide for the planer, we planned to plane each side then mated the matching sides together.
Final adjustments were made and decided the deck needed some support so we put a center board on the back side to keep the sides lined up.
Then we glued in some deck supports in the boat. We taped a stick to the top of the deck supports fo hold while gluing.
I n the past I consider using the "Durham's water putty" for a filler. For my building I decided not to because there was a warning against exposure to moisture.
That may not be a factor for you using it under fiberglass. The "professional" sites were building boats?
That may not be a factor for you using it under fiberglass. The "professional" sites were building boats?