Modified JEM Crawdad SS&G | Page 2 | SouthernPaddler.com

Modified JEM Crawdad SS&G

oldbuffpilot

Well-Known Member
May 13, 2014
629
34
80
Central Kansas and Central Texas
Yesterdays work
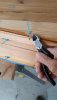
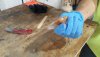
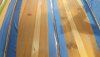
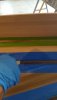
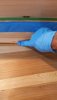
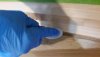
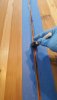
The stitches are removed from the seams if you have been careful and keeping epoxy off the stitches they come out easy. At this point I leave the forms stitched in, probably could also be removed at this point.

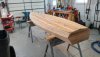
Sand then fill, sand then fill---- this will take a couple of days, more later.

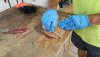
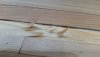
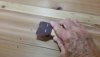
The gaps where the stitches were removed are filled with wood flour epoxy mix. While you are applying filleting material this is a good time to begin filling other holes, knot holes etc. Didn't get pictures of this step, it's hard to use the phone with wet epoxy on your gloves.

Had some showers today, I was treated to this rainbow going from the shop to the house. I am both blessed and grateful for how life has turned out.


Attachments:

Removing stitches

Rainbow

Good Fish'n, Andy
 

Attachments

  • removing wraps from tack welding.jpg
    removing wraps from tack welding.jpg
    20.4 KB · Views: 525
  • rainbow.jpg
    rainbow.jpg
    27.5 KB · Views: 488

oldbuffpilot

Well-Known Member
May 13, 2014
629
34
80
Central Kansas and Central Texas
The outside of the bottom is finally filled and sanded, smooth enough for now. I didn't get too particular about color stains because it will be covered with Graphite epoxy mix, so smooth is good enough.This process takes some time mostly because of cure time, I try to use the fast resin for this step.

The forms come out and time to start filling the inside. The outside holes for the forms stitches will have to be touched up later.

I like to mask off the fillet areas, makes the job much easier. Thinner tape conforms to curves better, but I ran out so used the wide blue tape.

First step is to prime the seams with epoxy, and let set a while. The filler (fillet) material is mixed slightly less viscous for the center and bottom seams, that just seems to work better. In warm weather I like to mix the RAKA medium cure at 1/2 pump resin to 1/4 pump hardner. A 1 pump resin to 1/2 pump hardner is also managable, but I've found that for fillets any larger mix heats up too fast. I measure and mark 1/2 and 1/4 marks on my pumps.

Small bags are available at craft stores and most Walmart food sections. Using the pictured steps I fill a bag, zip it, cut a very small corner off, push the mix down the bag and spread a fillet bead, usually the length of the seam. Next step is to shape the fillet and move on to the next seam. I prefer a putty knife for the flat center seam and a craft stick for the corner seams. After a few hours I carefully remove the tape and smooth any ridges on the edge of the fillet with a laquer thinner damp finger or a plastic spoon.

Good fish'n

Andy


Attachments:

Outside bottom filled and sanded

funnel for bag

prepping fillet material

fillet bag ready

Bead run in fillet seam

Shaping center seam fillet

Shaping side fillets

Smoothing fillet edges

Smoothing edges
 

Attachments

  • outside bottom filled and sanded.jpg
    outside bottom filled and sanded.jpg
    56.1 KB · Views: 540
  • funnel for bag.jpg
    funnel for bag.jpg
    791 KB · Views: 548
  • prepping filleting material in ziplock.jpg
    prepping filleting material in ziplock.jpg
    51.9 KB · Views: 551
  • fillet bag ready.jpg
    fillet bag ready.jpg
    53.2 KB · Views: 552
  • Bead run in center fillet.jpg
    Bead run in center fillet.jpg
    37.9 KB · Views: 557
  • Shaping center seam fillet.jpg
    Shaping center seam fillet.jpg
    43.3 KB · Views: 526
  • shaping fillet with craft stick.jpg
    shaping fillet with craft stick.jpg
    19.3 KB · Views: 528
  • smoothing fillet edge with finger.jpg
    smoothing fillet edge with finger.jpg
    22.4 KB · Views: 540
  • smoothing fillet edge.jpg
    smoothing fillet edge.jpg
    29.4 KB · Views: 524
  • Priming seam for fillet.jpg
    Priming seam for fillet.jpg
    23.8 KB · Views: 543

Gamecock

Well-Known Member
Jul 17, 2012
161
6
Hey Andy, your boat is really going to look nice. You said earlier that you fill the knots with epoxy and I noticed one in a photo. Do you use thickened epoxy to seal them up? Dave.
 

oldbuffpilot

Well-Known Member
May 13, 2014
629
34
80
Central Kansas and Central Texas
Dave, I use the same epoxy wood flour mix that I use for glue and fillets . I seal one side of the knot hole or stitch hole with masking tape fill the hole and smooth with a putty knife. the tape side rarely needs any more work, but the filled side usually needs another sand and fill session.
Andy
 

oldbuffpilot

Well-Known Member
May 13, 2014
629
34
80
Central Kansas and Central Texas
It's been a few days since there has been any signiifcant work on the Crawdad. Our youngest daughters family spent a 3 day visit with us, scouting deer, fishing, tubing, and last but not least, one grandson finished his pirogue! More about that project in a different post in a few days.

In the last post I should have made it clear that the tape outlining the fillets comes off before the epoxy has completely set, that way you can still smooth the edges with a spoon or finger.So the tape is off, the fillets are smooth. Ready to start the fill and sand process on the inside.

Each boat of course has a new lesson for us! I never had this happen before.As I was removing the masking tape around the fillets I notice one piece pulled pretty hard comming off, it was pulling the grain in the cedar up! I made sure to pull the rest of the tape with the grain. I've read many times on this forum, "don't worry about mistakes, it's wood and epoxy you can fix anything!" So this just causes a little more sand and fill. A few days of sand and fill and I'll be back with more progress.

Good Fish'n, Andy

Attachments:
Cedar Grain Pulled by tape
Sanding holes for filling
 

Attachments

  • Cedar grain pulled up by blue tape.jpg
    Cedar grain pulled up by blue tape.jpg
    36.5 KB · Views: 527
  • sanding roughedges for filling.jpg
    sanding roughedges for filling.jpg
    31.1 KB · Views: 510

oldsparkey

Well-Known Member
Aug 25, 2003
10,479
123
Central , Florida
www.southernpaddler.com
Each boat of course has a new lesson for us! I never had this happen before.As I was removing the masking tape around the fillets I notice one piece pulled pretty hard comming off, it was pulling the grain in the cedar up! I made sure to pull the rest of the tape with the grain.

Good Fish'n, Andy

A long time ago when I filleted the seams in the 1st boat ( Pygmy's Coho ) and later posted the pictures on how to do it. That was back in late 2001 or early 2002. Then riposted several times with other boats in response to questions.

I epoxy saturate each side of the seam ( about 1 1/2 inches on each side ) and let it set up. Then lightly sand that epoxy saturated strip , wipe it with a clean rag before applying the tape to each side of the seam then filleting the seam. Making sure you pull the tape before the epoxy in the fillet sets up. I used a medium epoxy and would pull the tape about 45 minutes later or when the epoxy was sticky.

The epoxy saturation protects the wood from the tape and causing the problem you had. Plus it helps to give the epoxy in the fillet something additional to bond with.
 

oldbuffpilot

Well-Known Member
May 13, 2014
629
34
80
Central Kansas and Central Texas
Jack and Chuck, Thanks for the suggestions. I also think that an "epoxy saturation" coat helps and is important. I had always taped the fillet area, then saturated the seams. never thought about they way Chuck does it. I'll bet it would have saved the pullled grain on this project. Now if I can just remember that until the next boat!
 

oldbuffpilot

Well-Known Member
May 13, 2014
629
34
80
Central Kansas and Central Texas
Back to the Modified "Short Side Crawdad". I also have one of these in Texas partially finished and waiting on winter and me to return. That is the boat that the sides warped a bit after sitting partially finished. So just in case I put some forms back in place on this one while I glass the outside of this boat. I know it's not necessary but I turn the boat on different angles to take advantage of gravity when glassing and have always been a little apprehensive about deforming.
With the inside and outside ready for epoxy I put some of the forms back in for support. Masking tape, and just a dab of hot glue to hold them as an experiment.
forms back in.jpg


A saturation coat of epoxy on the out side is next. When it's dry a light sanding to remove the "wiskers" seems to make the dry cloth handle easier on the boat. This tip was compliments of Chuck a few years back.

The cloth I have on hand is 60' wide so I cut it into two 30'' wide pieces and rolled up on swim tubes to keep creases from forming.

cloth cut to size.jpg
Tube pic


I know many folks would glass the out side in one piece and one step. I've found boats with tumble homes
can be difficult to glass with the tumble homes partially upside down. By tilting the boat I can take advantage of gravity when glassing. Also this puts two layers of cloth in area of wear. That is a good portion of the bottom and the ends. Of course this also adds weight.

The cloth is rolled out on the boat, and smoothed with a brush. This step takes out wrinkles, smooths the cloth and makes the glassing much easier.

smoothing dry cloth.jpg


Pics cloth on boat and brush

I like to apply the epoxy with a roller and keep the amount of epoxy to a minimum. Always work rolling from the middle of the cloth to the outside edges.
draping cloth.jpg

Pic glassed bottom
wet out.jpg


The laps or seams on the corners are always a little iffy. I now trim the excess cloth and epoxy to the corner and after it's green sett and trim it with a utility knife. I then clean it up when sanding the other class edges.
bow untrimmed.jpg


bow seam trimmed.jpg


Ready to repeat the process on the other side.

Please remember I am open to suggestions of how to do things better/easier. I learned every step from this forum!


Hopefully start on the inside tomorrow.

Good Fish'n, Andy
 

oldbuffpilot

Well-Known Member
May 13, 2014
629
34
80
Central Kansas and Central Texas
The glassing on the out side is done, the last step was to reinforce the bow and stern corners by overlaying more cloth. I prefer to mark off the area with masking tape The when the epoxy is just beyond tacky, trim the edge back from the tape. This makes a nice straight overlap seam and is easier to sand and make a nearly invisible seam.
Bow Reinforcement patch.jpg


I will glass the inside in three pieces. The bottom and then the side panels. I cut the bottom piece of cloth using the bottom panel patterns. I've found the covering the table with plastic makes it easier to handle and cut the cloth. The fabric doesn't hang up on the plastic. I also have found for me the rotary cutter easy to use. I use the plastic scraps for masking epoxy and such.

bottom cloth cut.jpg

Pic cloth cut


pic bottom smoothed.

Bottom cloth smoothed in place.jpg


After the bottom cloth is wet out and cured. We move on to the same steps with the side panels.

Side cloth cut rolled up. Smoothed out with a brush, wet out, and trimmed when cured.
cloth for side panels ready to go.jpg


20180930_164730.jpg

Excess cloth is trimmed

side panel wet out.jpg

wet out side panels


Next will be the final wet out coats, sand and sand some more. Add a deck, slotted inwales, and a rod holder.


Be back in a week or so with an update.


Good fish'n,


Andy
 

Kayak Jack

Well-Known Member
Aug 26, 2003
13,976
171
86
Okemos / East Lansing Michigan
Andy, your boat looks so nice that the fish you catch will already be cleaned. No cruddy, scaly fish fulla guts will approach that boat. Some fish you catch, may even bring along their own breading.- and maybe a cold beer.

Kepp'em flying.
 

oldbuffpilot

Well-Known Member
May 13, 2014
629
34
80
Central Kansas and Central Texas
This week's work on the boat has been mostly waiting for fill coats to cure. For fill coats I do it in sections. I like to keep the surfaces as horizontal as practical, it takes longer, but easier as it helps prevent those pesky epoxy runs. Every morning this week I sanded the floor, vacuum, and wipe down. Then using thin coats,roll on the epoxy, and tip it with a foam brush., I'm on coat number six and think one more will do it.I use a wooster 1/8 inch foam roller. I get the 7" or 9" rollers and cut them to 3" or 4" on the Band saw. Then I use a 4" foam brush to tip it off. This helps to leave an even coat and eliminates most(not all) of the tiny air bubbles. I find I can recycle the brushes to some extent. The rollers and brushes are available on Amazon, prices vary so you need to look around even on Amazon. The fill coats are where the building slows down.

While it's curing I find something else to keep boat work going.I'll try to post those odd jobs later as the forum will only take 10 photos.

No pics of rolling, kind'a difficult to roll and take pics. Epoxy and phones don't mix!

Tipping wet out.jpg

recycling tipping brush.jpg


Good Fish'n

Andy
 

oldsparkey

Well-Known Member
Aug 25, 2003
10,479
123
Central , Florida
www.southernpaddler.com
I found the rollers at Home Depot and cut each in half which worked out really good when glassing the boats. One half of a roller for one batch of epoxy. Also found the foam brushes at Home Depot that I used for the final touch up. I could use one brush a couple of times before it got tossed.
Something that worked good with the rollers was a disposable plastic paint tray liner in the paint tray. Made cleaning the paint trays easy , just let the epoxy set up after the 2nd batch and pull it out of the tray.the next day. When some epoxy refused to leave then I started a new tray.
I found with the epoxy spread out in the deeper portion of the tray it did not set up as fast in the tray and gave me a little more working time.